...
| Table of Contents | ||
|---|---|---|
|
Windows
...
10 or 11
This guide provides step-by-step instructions for troubleshooting common connection issues seen with Windows 8 10 computers connecting to SU-secure. After completing each numbered section, attempt to connect to SU-secure again. If you are unsuccessful in connecting, continue on to the next numbered section.
Validate Username/Password
...
Browse to https://
...
...
and log in using your SeattleU credentials.
If you are unable to log in, visit https://pwreset.seattleu.edu/ and click on ‘I forgot my password’. Follow the steps to reset your SeattleU password.
Repeat
...
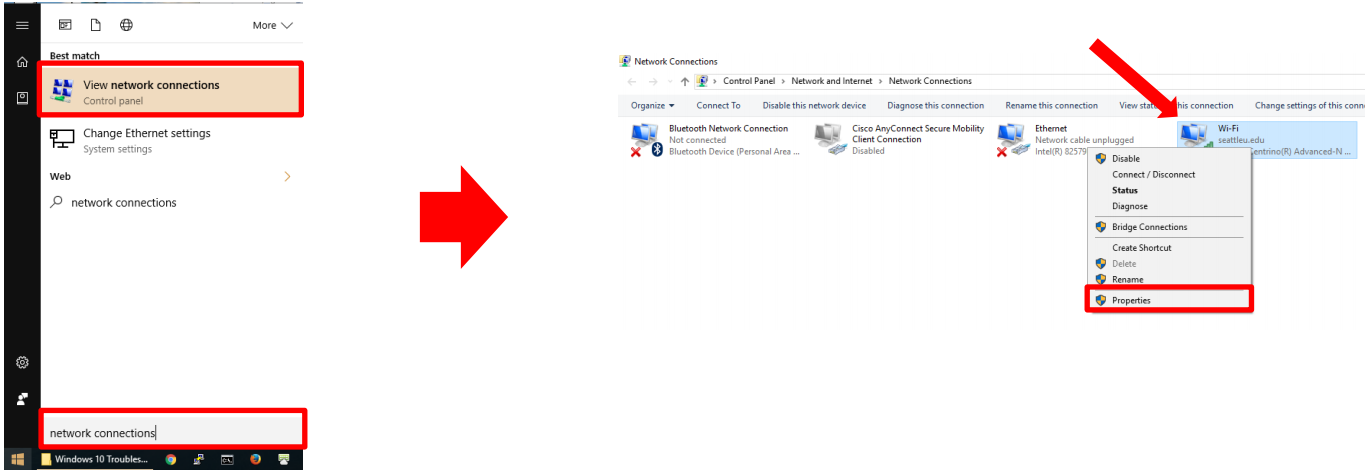
On the Network Connections menu that appears, right-click your Wi-Fi adapter and select ‘Properties’
...
...
step 1 to validate you can log in to your account before attempting to connect to SU-secure again.
...
Delete and rebuild SU-secure wireless profile
Remove the existing SU-secure profile from your device
Click on the wifi icon in the system tray
Right click on SU-secure and click ‘Forget this network’

Follow the SU-secure configuration guide for your device found here: https://seattleuniversity.atlassian.net/wiki/spaces/ISD/pages/1082622022/SU-secure+Configure+Your+Connection#Windows-8
Validate that there are no static IP or DNS server settings
...
Press the start button, type ‘Network Connections’, and click on ‘View network connections’
Verify the Date, Time, and Time Zone settings are correct
Once correct try connecting to SU-secure. If you are unable to authenticate proceed with the steps below.
Validate there are no static IP or DNS server settings
Press the start button, type ‘Network Connections’, and click on ‘View network connections’
On the Network Connections menu that appears, right-click your Wi-Fi adapter and select ‘Properties’
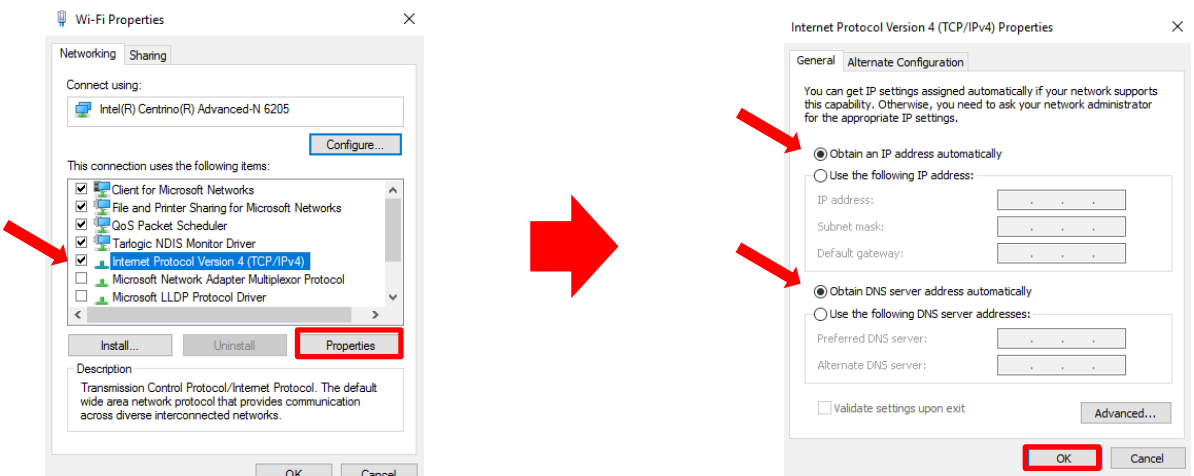
In the Wi-Fi Properties menu, ensure ‘Internet Protocol Version 4’ is checked, highlight it, and then click the properties button
Ensure that both the IP address and DNS server settings are set to Obtain Automatically and then press ‘OK’. Then press ‘OK’ on the Wi-Fi Properties menu
...
Check for Avast Antivirus:
...
If Avast Antivirus is installed, disable the Secure DNS service it runs by performing the following:
Open Avast
...
Browse to Avast > Settings > Active Protection > Secure DNS
Set Secure DNS to OFF
Validate
...
the operating system and device drivers are up to date
Validate that Windows is up to date
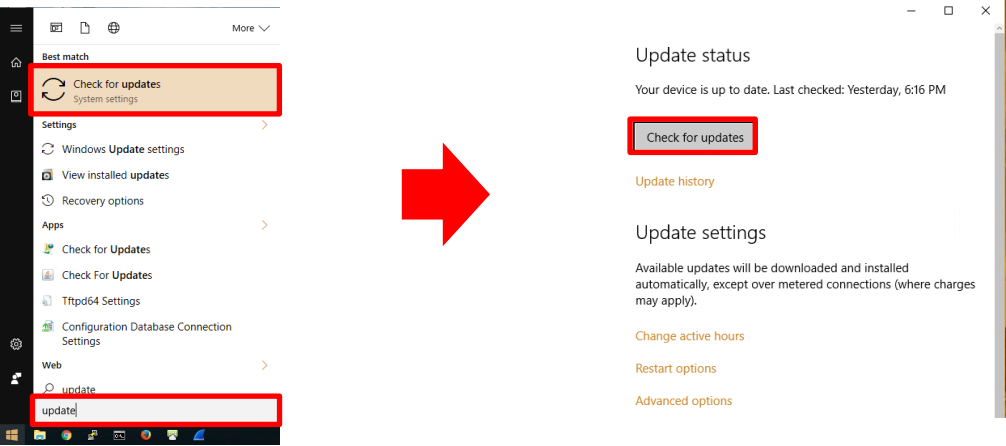
Press the start button, type ‘update’, and click on ‘Check for updates’
Click the ‘Check now’ button and allow any updates to install. Once updates are installed, restart your machine
...
...
Validate that wireless drivers are up to date
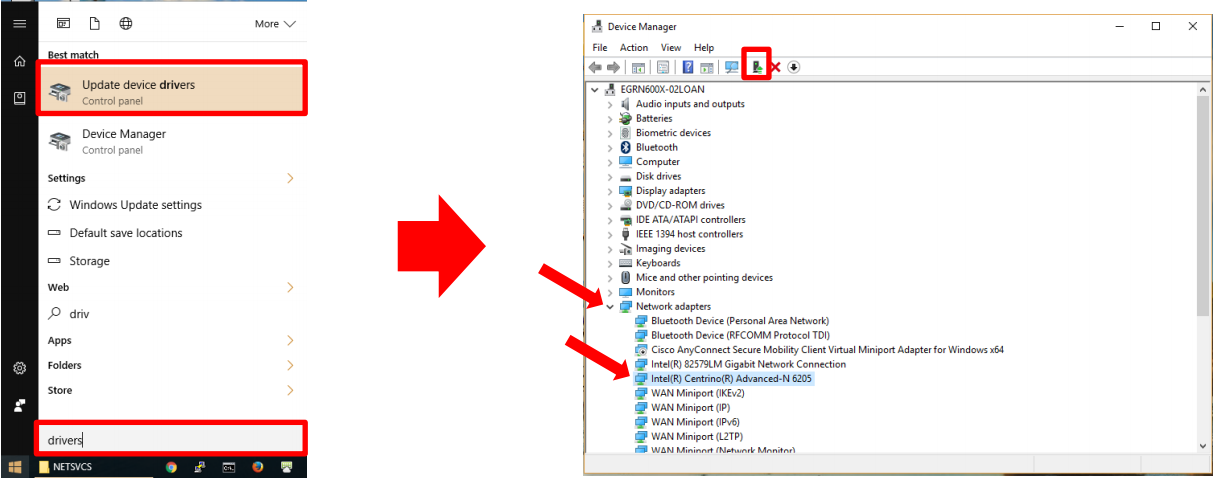
Press start, type ‘drivers’, and click on ‘Update device drivers’
Expand the ‘Network Adapters’ section of the Device Manager list
Select your wireless adapter from the expanded list and click the ‘Update Driver Software’ button. The name of your wireless adapter may vary from the image below depending on the hardware you are using.
...
If drivers are updated, restart your machine.
...
...
If you are still unable to connect
If you are still unable to connect to SU-secure after following the troubleshooting steps in this document, you can contact the Service Desk for assistance.
| Info |
|---|
When opening a support ticket with the Service Desk, please provide the following information:
|
Windows 10
This guide provides step-by-step instructions for troubleshooting common connection issues seen with Windows 10 computers connecting to SU-secure. After completing each numbered section, attempt to connect to SU-secure again. If you are unsuccessful in connecting, continue on to the next numbered section.
...
Validate Username/Password
Visit the SUonline page at https://suonline.seattleu.edu/
Log in to SUonline using your SeattleU credentials.
If you are unable to log in, visit https://pwreset.seattleu.edu/ and click on ‘I forgot my password’. Follow the steps to reset your SeattleU password.
Repeat step 1 to validate you can log in to your account before attempting to connect to SU-secure again.
...
Delete and rebuild SU-secure wireless profile
Remove the existing SU-secure profile from your device
Click on the wifi icon in the system tray and click on ‘Network settings’
On the Wi-Fi settings menu, click ‘Manage known networks’
On the ‘Manage known networks’ menu, click on SU-secure and click ‘Forget’

Follow the SU-secure configuration guide for your device found here: https://seattleuniversity.atlassian.net/wiki/spaces/ISD/pages/1082622022/SU-secure+Configure+Your+Connection#Windows-10
...
Validate that there are no static IP or DNS server settings
Press the start button, type ‘Network Connections’, and click on ‘View network connections’
On the Network Connections menu that appears, right-click your Wi-Fi adapter and select ‘Properties’
In the Wi-Fi Properties menu, ensure ‘Internet Protocol Version 4’ is checked, highlight it, and then click the properties button
Ensure that both the IP address and DNS server settings are set to Obtain Automatically and then press ‘OK’. Then press ‘OK’ on the Wi-Fi Properties menu
...
Check for Avast Antivirus: If Avast Antivirus is installed, disable the Secure DNS service it runs by performing the following:
Open Avast Browse to Avast > Settings > Active Protection > Secure DNS
Set Secure DNS to OFF
...
Validate that operating system and device drivers are up to date
Validate that Windows is up to date
Press the start button, type ‘update’, and click on ‘Check for updates’
Click the ‘Check now’ button and allow any updates to install. Once updates are installed, restart your machine
Validate that wireless drivers are up to date
Press start, type ‘drivers’, and click on ‘Update device drivers’
Expand the ‘Network Adapters’ section of the Device Manager list
Select your wireless adapter from the expanded list and click the ‘Update Driver Software’ button. The name of your wireless adapter may vary from the image below depending on the hardware you are using.
If drivers are updated, restart your machine.
Delete and rebuild SU-secure wireless profile
Remove the existing SU-secure profile from your device
Click on the wifi icon in the system tray and click on ‘Network settings’
On the Wi-Fi settings menu, click ‘Manage known networks’
On the ‘Manage known networks’ menu, click on SU-secure and click ‘Forget’
Follow the SU-secure configuration guide for your device found here: https://seattleuniversity.atlassian.net/wiki/spaces/ISD/pages/1082622022/SU-secure+Configure+Your+Connection#Windows-10
Perform a Network Reset
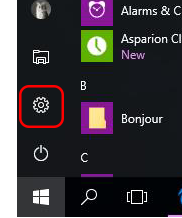
From the Start Menu, navigate to Settings.
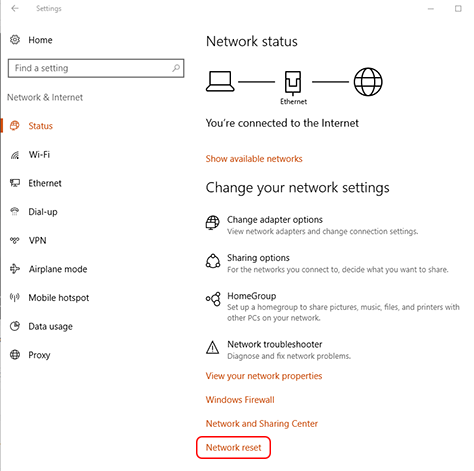
Click on Network & Internet

By default, you should be on the status tab. Click Network Reset.
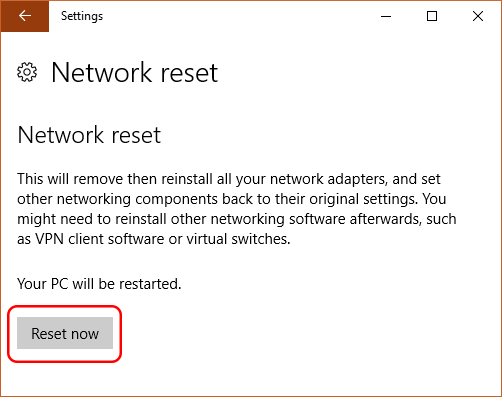
Click Reset now.
Restart your computer and reconnect to wifi.
If you are still unable to connect
If you are still unable to connect to SU-secure after following the troubleshooting steps in this document, you can contact the Service Desk for assistance
| Info |
|---|
When opening a support ticket with the Service Desk, please provide the following information:
|
...
macOS
This guide provides step-by-step instructions for troubleshooting common connection issues seen with Mac OSX macOS computers connecting to SU-secure. After completing each numbered section, attempt to connect to SU-secure again. If you are unsuccessful in connecting, continue on to the next numbered section.
Verify Username/Password
...
Browse to https://
...
...
...
my.seattleu.edu/ please follow the instructions at https://www.seattleu.edu/its/support/support-articles/reset
...
-your-su-password.html to reset your password.
If you are still unable to authenticate to SU-secure after resetting your password proceed to the troubleshooting steps below.
Verify the Date, Time, and Time Zone settings are correct
Once correct try connecting to SU-secure. If you are unable to authenticate proceed with the steps below.
Verify there are no static IP or DNS server settings
Press the wifi icon in the status menu and select ‘Open Network Preferences’
On the ‘Network’ menu, select your Wi-Fi network and click on ‘Advanced…’

Click on the ‘TCP/IP’ tab and verify ‘Configure IPv4’ is set to ‘Using DHCP’
Click on the ‘DNS’ tab and verify the DNS servers listed are 172.17.72.xx and 172.17.61.26. Remove any other entries. If there are no DNS servers in the list, do NOT manually add any DNS servers. Press ‘OK’ when completed.

Verify if a wireless profile has an outdated security certificate
You will be unable to authenticate to SU-secure if your Mac computer contains an expired security certificate in the SU-secure wireless profile. The former certificate expired Sep 1 2019. Follow the steps below to verify if your Mac has the wireless profile and if so the expiration date of the stored certificate.
From the Apple menu select System Preferences
Select Profiles as shown below

If Profiles is not present there are no profiles configured; this is normal as not all Macs will have it. Skip the remaining steps and exit System Preferences.
Click the SU-secure profile in the left frame. If the Expired date is prior to today’s date, such as the example of Sep 1 2019 below, the expired certificate is used. The wireless profile must be deleted.

Click the minus sign at the lower left of the window to remove the profile. If prompted enter the username and password of the authorized user to remove the profile.
Agree to any remaining prompts to remove the profile

Close the open windows
You should now be able to re-connect to SU-secure and successfully authenticate. Proceed with the remaining steps only if you cannot authenticate to SU-secure and access external web pages.
Forget the SU-secure network
Press the wifi icon in the status menu and select ‘Open Network Preferences’
On the ‘Network’ menu, select your Wi-Fi network and click on ‘Advanced…’

In the ‘Wi-Fi’ tab, select SU-secure, click on the minus button to remove the network, and then click ‘OK’
Click the ‘Apply’ button on the Network menu to apply the settings.

Re-connect to SU-secure following the configuration guide for your device found at: https://seattleuniversity.atlassian.net/wiki/spaces/ISD/pages/1082622022/SU-secure+Configure+Your+Connection#Mac-OS-X
Check for Applications Known to Impact SU-secure Functionality
Avast Antivirus forces your Mac to use external DNS servers. Such DNS use is blocked by the SeattleU firewall. Open Avast, select Settings, select Components,
...
set Secure DNS to off.
Verify the operating system is up to date
Click the Apple button and select ‘About This Mac’
On the ‘Overview’ tab, select ‘Software Update…’ and install any updates
If you are still unable to connect
If you are still unable to connect to SU-secure after following the troubleshooting steps in this document, you can contact the Service Desk for assistance
| Info |
|---|
When opening a support ticket with the Service Desk, please provide the following information:
|
...
This guide provides step-by-step instructions for troubleshooting common connection issues seen with iPhone and iPad devices connecting to SU-secure. After completing each numbered section, attempt to connect to SU-secure again. If you are unsuccessful in connecting, continue on to the next numbered section.
Validate Username/Password
...
Browse to https://
...
...
and log in using your SeattleU credentials. If successful skip to step 2.
If you are unable to log in
...
Visit https://pwreset.seattleu.edu/ and click on ‘I forgot my password’. Follow the steps to reset your SeattleU password.
Repeat
...
step 1a
...
to validate you can log
...
in to your account before continuing.
Verify the Date, Time, and Time Zone settings are correct
Once correct try connecting to SU-secure
...
. If you are unable to authenticate proceed with the steps below.
Delete and rebuild SU-secure wireless profile
Remove the existing SU-secure profile from your device
Tap on the Settings app
Tap on the wifi settings menu

Tap on the blue ‘i’ next to SU-secure
If the ‘Forget this network’ button is present, tap it, and continue on to the next step, otherwise continue on to step v in this section.

Tap the back button in the top left corner to return to the settings menu, scroll down to ‘General’ and tap on it
In the General settings menu, scroll down to ‘Profile’ and Tap on it

. In the Profile menu, tap the SU-secure profile
. In the SU-secure profile, tap ‘Delete Profile’, and ‘Delete’ once more when it appears at the bottom of the screen.

Follow the SU-secure configuration guide for your device found at:https://seattleuniversity.atlassian.net/wiki/spaces/ISD/pages/1082622022/SU-secure+Configure+Your+Connection#iPhone-and-iPad
Validate
...
the operating system is up to date
Validate that IOS is up to date
Tap on the Settings app
Tap on ‘General’, then tap on Software Update
Install any software updates and restart your device.

If you are still unable to connect
If you are still unable to connect to SU-secure after following the troubleshooting steps in this document, you can contact the Service Desk for assistance
| Info |
|---|
When opening a support ticket with the Service Desk, please provide the following information:
|
Android
This guide provides step-by-step instructions for troubleshooting common connection issues seen with Android devices connecting to SU-secure. After completing each numbered section, attempt to connect to SU-secure again. If you are unsuccessful in connecting, continue on to the next numbered section.
Validate Username/Password
...
Browse to https://
...
...
and log in using your SeattleU credentials. If successful skip to step 2.
If you are unable to log in
...
Visit https://pwreset.seattleu.edu/ and click on ‘I forgot my password’. Follow the steps to reset your SeattleU password.
Repeat
...
step 1a
...
to validate you can log in to your account before
...
continuing.
Verify the Date, Time, and Time Zone settings are correct
Once correct try connecting to SU-secure. If you are unable to authenticate proceed with the steps below.
Delete and rebuild SU-secure wireless profile
Remove the existing SU-secure profile from your device
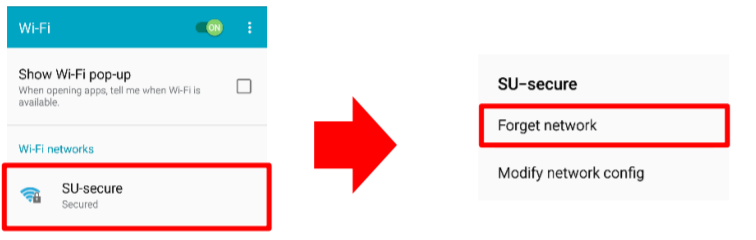
Tap on the Settings app to open up the settings menu

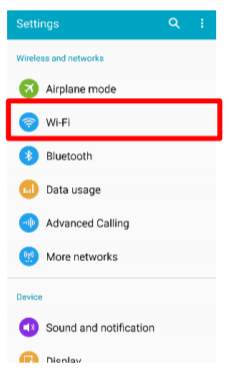
Tap on the Wi-Fi settings option
c. Tap and hold on the SU-secure network and then tap on ‘Forget network’
Follow the SU-secure configuration guide for your device found at: https://seattleuniversity.atlassian.net/
...
...
Validate the operating system is up to date
Validate that Android is up to date
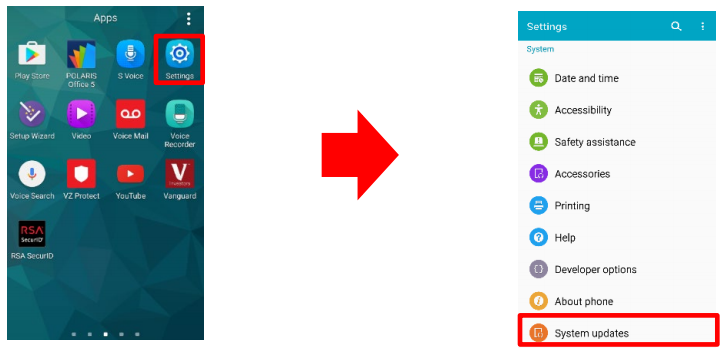
Tap on the Settings app to open up the settings menu
Scroll down and tap on ‘System updates’
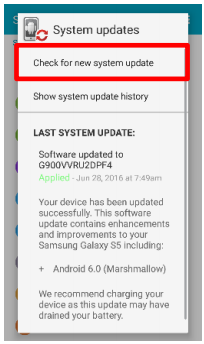
Tap on ‘Check for new system update’. If updates are installed, restart your device.
If you are still unable to connect
If you are still unable to connect to SU-secure after following the troubleshooting steps in this document, you can contact the Service Desk for assistance
| Info |
|---|
When opening a support ticket with the Service Desk, please provide the following information:
|
...
This guide provides step-by-step instructions for troubleshooting common connection issues seen with Windows 10 computers connecting to SU-secure. After completing each numbered section, attempt to connect to SU-secure again. If you are unsuccessful in connecting, continue on to the next numbered section.
Validate Username/Password
...
Browse to https://
...
...
and log in using your SeattleU credentials. If successful skip to step 2.
If you are unable to log in
...
Visit https://pwreset.seattleu.edu/ and click on ‘I forgot my password’. Follow the steps to reset your SeattleU password
...
.
Repeat step 1a to validate you can log in to your account before continuing.
Verify the Date, Time, and Time Zone settings are correct
Once correct try connecting to SU-secure. If you are unable to authenticate proceed with the steps below.
Delete and rebuild the SU-secure wireless profile
...
following the instructions for your device found at
...
...
.
Validate that there are no static IP or DNS server settings
Click on your account photo
Click on the wifi settings button

Click the ‘Network settings’ gear button

Click the wifi settings button

Click the arrow next to SU-secure

Click the Network
...
drop down arrow

Confirm that ‘Configure IP address automatically’ is enabled

Confirm that Name servers are set to ‘Automatic name servers’
If you are still unable to connect
If you are still unable to connect to SU-secure after following the troubleshooting steps in this document, you can contact the Service Desk for assistance
| Info |
|---|
When opening a support ticket with the Service Desk, please provide the following information:
|
...