Configure Your Connection
Wifi devices require configuration before they can connect to the SU-secure wireless network. Please follow the guides below for instructions on configuring your specific device type for connecting to SU-secure.
Windows 8
This guide provides step-by-step instructions for both automatically and manually configuring your Windows 8 computer to connect to SU-secure. Attempt automatic configuration first. Only attempt manual configuration if automatic configuration is unsuccessful. SU-secure is only available for use by Seattle University students, faculty, staff, and Jesuits. For information about guest wireless access, please visit the guest account page at: https://www.seattleu.edu/support/guides/guest-accounts/
Remove Existing SU-secure Profile
Click on the wifi icon in the system tray.
Right click on SU-secure and select ‘Forget this network’.

Automatic Configuration
Per the instructions above, ensure you have removed any existing SU-secure profiles from your device.
Visit the ITS downloads page at https://www.seattleu.edu/support/downloads/. You may be prompted to enter your SeattleU credentials to access this page.
Locate the ‘Autoconfigure SU-secure’ heading and download the Windows Devices configuration package.
Locate the ‘AutoConfigureWindows-SU-secure.zip’ file in your downloads folder
Right-click the folder, select ‘Extract All’ and then click on the ‘Extract’ button.
The extracted contents of ‘Autoconfigure SU-secure.zip’ will appear.
Double click the ‘RUNME – Auto configure SU-secure’ file to automatically configure your SU-secure connection.
Select SU-secure from the list of available networks, click connect, and enter your SeattleU credentials in the authentication prompt that appears.
Manual Configuration
Add SU-secure to your wifi network list
Click on the start button, type ‘network and sharing center’ in the search bar, and click on the Network and Sharing Center button. The Network and Sharing Center will appear.
Click on the ‘Set up a new connection or network’ button to add a new wireless network.

The Set Up a Connection or Network menu will appear. Select ‘Manually connect to a wireless network’ and press ‘Next’ to continue.

The initial connection set up menu will appear. Enter the following information and then click ‘Next’ to add SU-secure to your list of wireless networks
Network name: SU-secure
Security type: WPA2-Enterprise
Encryption type: AES
Security key: Leave blank
Start this connection automatically: Checked
Connect even if the network is not broadcasting: Unchecked

Configure your connection
A window will appear that confirms SU-secure was successfully added. Select ‘Change connection settings’ to continue to the wireless properties menu.
Click on the ‘Security’ tab at the top of the wireless properties menu.

Once on the Security tab, ensure the following settings are configured:
Network authentication method: Microsoft: Protected EAP (PEAP)
Remember my credentials for this connection each time I’m logged on: Checked
Then click the ‘Settings’ button next to the network authentication method drop down bar.

The Protected EAP properties menu will appear. Make the following changes and click ‘OK’:
Validate server certificate: Checked.
Connect to these servers: Checked.
Server list: oitias2.seattleu.edu;
Trusted Root Certification Authorities: Check ‘AddTrust External CA Root’ and then scroll down in the list to check ‘USERTrust RSA Certification Authority’
Do not prompt user to authorize new servers or trusted certification authorities: Unchecked.
Select Authentication Method: Secured password (EAP-MSCHAP v2).
Click on ‘Configure…’ next to the Authentication method dropdown bar and uncheck ‘Automatically use my windows logon name and password’ in the popup box that appears, then click ‘OK’.
Enable Fast Reconnect: Checked.

Click ‘OK’ on the Protected EAP properties menu.
Click ‘OK’ on the Wireless Network Properties menu.
Click ‘Close’ on the Manually Connect to a Wireless Network menu.
Click on the wifi icon in the system tray to bring up the list of available wireless networks. Select SU-secure from the list and click ‘Connect’.
You will be prompted to enter your credentials. Enter your SU credentials and click ‘OK’ to connect.

Verify that you are connected
Upon successful connection, your system tray menu will show that you are connected to SU-secure:

If you are unable to connect your device to SU-secure after following the above steps please continue to the troubleshooting guide appropriate for your device.
Windows 10
This guide provides step-by-step instructions for both automatically and manually configuring your Windows 10 computer to connect to SU-secure. Attempt automatic configuration first. Only attempt manual configuration if automatic configuration is unsuccessful. SU-secure is only available for use by Seattle University students, faculty, staff, and Jesuits. For information about guest wireless access, please visit the guest account page at: https://www.seattleu.edu/support/guides/guest-accounts/
Remove Existing SU-secure Profile
Click on the wifi icon in the system tray and click on ‘Network settings’
Click on the Wi-Fi settings menu, then click ‘Manage known networks’
On the ‘Manage known networks’ menu, select ‘SU-secure’ and click ‘Forget’

Automatic Configuration
Per the instructions above, ensure you have removed any existing SU-secure profiles from your device.
Visit the ITS downloads page at https://www.seattleu.edu/support/downloads/. You may be prompted to enter your SeattleU credentials to access this page.
Locate the ‘Autoconfigure SU-secure’ heading and download the Windows Devices configuration package.
Locate the ‘AutoConfigureWindows-SU-secure.zip’ file in your downloads folder
Right-click the folder, select ‘Extract All’ and then click on the ‘Extract’ button
The extracted contents of ‘Autoconfigure SU-secure.zip’ will appear
Double click the ‘RUNME – Auto configure SU-secure’ file to automatically configure your SU-secure connection
Select SU-secure from the list of available networks, click connect, and enter your SeattleU credentials in the authentication prompt that appears
Manual Configuration
Add SU-secure to your wifi network list
Click on the start button, type ‘Network and Sharing Center’ in the search bar, and hit the enter key. The Network and Sharing Center will appear.
Click on the ‘Set up a new connection or network’ button to add a new wireless network.

The Set Up a Connection or Network menu will appear. Select ‘Manually connect to a wireless network’ and press ‘Next’ to continue.

The initial connection set up menu will appear. Enter the following information and then click ‘Next’ to add SU-secure to your list of wireless networks
Network name: SU-secure
Security type: WPA2-Enterprise
Encryption type: AES
Security key: Leave blank
Start this connection automatically: Checked
Connect even if the network is not broadcasting: Unchecked

Configure your connection
A window will appear that confirms SU-secure was successfully added. Select ‘Change connection settings’ and continue to the ‘Wireless Network Properties’ menu
Click on the ‘Security’ tab at the top of the menu.

Once on the Security tab, ensure the following settings are configured:
Network authentication method: Microsoft: Protected EAP (PEAP)
Remember my credentials for this connection each time I’m logged on: Checked
Then click the ‘Settings’ button next to the network authentication method drop down bar.

The Protected EAP properties menu will appear. Make the following changes and click ‘OK’:
Validate server certificate: Checked
Connect to these servers: Checked
Server list: oitias2.seattleu.edu;
Trusted Root Certification Authorities: Check ‘AddTrust External CA Root’ and then scroll down in the list to check ‘USERTrust RSA Certification Authority’
Do not prompt user to authorize new servers or trusted certification authorities: Unchecked
Select Authentication Method: Secured password (EAP-MSCHAP v2)
Click on ‘Configure…’ next to the Authentication method dropdown bar and uncheck ‘Automatically use my windows logon name and password’ in the popup box that appears, then click ‘OK’
Enable Fast Reconnect: Checked

Click ‘OK’ on the Protected EAP properties menu
Click ‘OK’ on the Wireless Network Properties menu
Click ‘Close’ on the Manually Connect to a Wireless Network menu.

Click on the wifi icon in the system tray to bring up the list of available wireless networks. Select SU-secure from the list and click ‘Connect’.
Enter your SeattleU credentials in the login window that appears and click ‘OK’ to connect.

Verify that you are connected
Upon successful connection, the system tray menu will show that you are connected to SU-secure:

If you are unable to connect your device to SU-secure after following the above steps please continue to the troubleshooting guide appropriate for your device.
Mac OS X
This guide provides step-by-step instructions for both automatically and manually configuring your Mac OSX computer to connect to SU-secure. Attempt automatic configuration first. Only attempt manual configuration if automatic configuration is unsuccessful. SU-secure is only available for use by Seattle University students, faculty, staff, and Jesuits. For information about guest wireless access, please visit the guest account page at: https://www.seattleu.edu/support/guides/guest-accounts/
Remove Existing SU-secure Profile
Press the wifi icon in the status menu and select ‘Open Network Preferences’
On the ‘Network’ menu, select your Wi-Fi network and click on ‘Advanced…’

In the ‘Wi-Fi’ tab, select SU-secure from the list and click on the minus button to remove it. Then click ‘OK’.
Click the ‘Apply’ button on the Network menu to apply the settings.

Automatic Configuration
Per the instructions above, ensure you have removed any existing SU-secure profiles from your device.
Visit the ITS downloads page at https://www.seattleu.edu/support/downloads/. You may be prompted to enter your SeattleU credentials to access this page.
Locate the ‘Auto Configure SU-secure’ heading and download the Apple Devices configuration package.
Locate the ‘AutoConfigureApple-SU-secure.mobileconfig’ file in your downloads and double click it to begin installation.
Click ‘Continue’ to install the SU-secure profile. Press ‘Continue’ again when you are prompted that the author of the profile is unknown.
Enter your SeattleU credentials when prompted and click ‘Install’.
If prompted, enter administrator credentials and click ‘OK’.
Manual Configuration
Connect to SU-secure.
Click on the wireless icon in the system toolbar to bring up the list of available wireless networks.
Ensure that your wifi antenna is switched on, and then select ‘SU-secure’ from the list of available networks.

Enter your credentials.
A window will appear that prompts you to enter your credentials. Enter your SeattleU username and password, ensure ‘Remember this network is checked’, and click ‘Join’

You may be asked to verify the security certificate. Verify that you are authenticating to either oitias1.seattleu.edu or oitias2.seattleu.edu and then click ‘Continue’ to accept the certificate and connect.

Verify that you are connected
Upon successful connection, your wifi menu will show a check mark next to SU-secure:

If you are unable to connect your device to SU-secure after following the above steps please continue to the troubleshooting guide appropriate for your device.
iPhone and iPad
This document provides step-by-step instructions for both automatically and manually configuring your Apple iPhone or iPad to connect to SU-secure. Attempt automatic configuration first. Only attempt manual configuration if automatic configuration is unsuccessful. SU-secure is only available for use by Seattle University students, faculty, staff, and Jesuits. For information about guest wireless access, please visit the guest account page at: https://www.seattleu.edu/support/guides/guest-accounts/
Remove Existing SU-secure Profile
Tap on the Settings app
Tap on the wifi settings menu

Tap on the blue ‘i’ next to SU-secure
Tap the ‘Forget this network’ button.

Automatic Configuration
Per the instructions above, ensure you have removed any existing SU-secure profiles from your device.
Using Safari as your web browser, visit the ITS downloads page at https://www.seattleu.edu/support/downloads/. You may be prompted to enter your SeattleU credentials to access this page.
Locate the ‘Auto Configure SU-secure’ heading and download the Apple Devices configuration package.
Run the ‘AutoConfigureApple-SU-secure.mobileconfig’ file
Tap ‘Install’ in the top right corner
Enter your device passcode if prompted
Tap ‘Install’ in the top right corner, and ‘Install’ once more on the popup that appears
Enter your SeattleU username and tap ‘Next’, then enter your SeattleU password and tap next
Manual Configuration
Connect to SU-secure
Tap on the settings app from the home screen.
Tap on the wifi button on the settings menu to open up the wifi settings menu.

On the wifi settings menu, ensure that the wifi switch is set to on (green), and then tap on SU-secure to connect.

Configure your connection
Enter your SeattleU username and password when prompted and tap ‘Join'
You will be prompted to accept a security certificate. Verify that the certificate has the following properties and tap ‘Trust’:
Name: oitias1.seattleu.edu OR oitias2.seattleu.edu
Issued by: InCommon Server CA
Verify that you are connected
Upon successful authentication, your wifi settings menu will show a checkmark next to SU-secure:

If you are unable to connect your device to SU-secure after following the above steps:
Validate that there are no static IP address or DNS settings that are configured on your device. Devices that are configured with a static IP address or static DNS settings will not be able to connect to SU-secure
Validate that the username and password being used are your current SeattleU username and password
Continue to the guide appropriate for your device.
Android
This guide provides step-by-step instructions for configuring your Android phone to connect to SU-secure. SU-secure is only available for use by Seattle University students, faculty, staff, and Jesuits. For information about guest wireless access, please visit the guest account page at: https://www.seattleu.edu/support/guides/guest-accounts/
Remove Existing SU-secure Profile
Tap on the Settings app to open up the settings menu
Tap on the Wi-Fi settings option

Tap and hold on the SU-secure network and then tap on ‘Forget network’

Manual Configuration
Connect to SU-secure
Tap on the Settings app to open up the settings menu:

On the settings menu, tap on the ‘Wi-Fi’ button under the Wireless and Networks section to open the wifi menu.
On the wifi menu, ensure the wifi slider at the top of the page is set to ‘On’, then select ‘SU-secure’ from the list of available networks by tapping on it.

Configure your connection
After tapping on SU-secure, a menu will appear that will allow you to change settings for your connection. Enter your connection settings as follows and tap connect to connect:
EAP method: PEAP
Phase 2 Authentication: MSCHAPV2
CA certificate: Unspecified
Identity: Your SeattleU username (i.e. doej@seattleu.edu)
Anonymous identity: Leave blank
Enter password: Your SeattleU password

Verify that you are connected
Upon successful authentication, your wifi menu will show that you are connected to SU-secure:

If you are unable to connect your device to SU-secure after following the above steps please continue to the troubleshooting guide appropriate for your device.
Chrome OS
This guide provides step-by-step instructions for both automatically and manually configuring your ChromeOS device to connect to SU-secure. SU-secure is only available for use by Seattle University students, faculty, staff, and Jesuits. For information about guest wireless access, please visit the guest account page at: https://www.seattleu.edu/support/guides/guest-accounts/
Remove Existing SU-secure Profile
Click on your account photo
Click on the wifi settings button
Click the ‘Network settings’ gear button
Click the wifi settings button

Click the ‘Known networks’ button
Click the ‘…’ button next to SU-secure
Select ‘Forget’ to forget the SU-secure network

Manual Configuration
Select SU-secure the list of available wifi networks
Click on your account photo
Click on the wifi settings button
Select SU-secure from the list of available networks

Configure settings
After selecting SU-secure, a window will appear that asks for connection settings. Change the following settings:
EAP Method: PEAP
EAP Phase 2 Authentication: MSCHAPv2
Server CA certificate: Do not check
Identity: Your SeattleU username, i.e doej@seattleu.edu
Password: Your SeattleU password
Click the connect button to connect

Verify that you are connected
Upon successful connection, the wifi status indicator will show that you are connected to SU-secure:

Troubleshoot Your Connection
SU-secure is designed for University business use by students, faculty and staff. Please follow the guides below to troubleshoot your connection:
Windows 7
This document provides step-by-step instructions for troubleshooting common connection issues seen with Windows 7 computers connecting to SU-secure. After completing each numbered section, attempt to connect to SU-secure again. If you are unsuccessful in connecting, continue on to the next numbered section.
Steps for Service Desk Members
Validate that the account is not locked out
Open Active Directory Users and Computers
Search for the account username and double click on the account
Click on the ‘Account’ tab
Validate that there is no ‘This account is locked’ message
If the account is locked, unlock it and have the user attempt to log back in
If repeated lockouts are seen, escalate the request to server engineers to identify which device is locking the user out.
Validate that the account has the correct group membership
Open Active Directory Users and Computers
Search for the username and double click on the account
Click on the ‘Member of’ tab
Validate that the account is a member of one of the following Active Directory groups: ALL-STAFF, ALL-FACULTY, ALLSTUDENT, ALL-ADJUNCT, Jesuit.
Steps for end-users
Validate Username/Password
Visit the SUonline page at https://suonline.seattleu.edu/
Log in to SUonline using your SeattleU credentials.
If you are unable to log in, visit https://pwreset.seattleu.edu/ and click on ‘I forgot my password’. Follow the steps to reset your SeattleU password.
Repeat steps 1a and 1b to validate you can log in to your account before attempting to connect to SU-secure again.
Delete and rebuild SU-secure wireless profile
Remove the existing SU-secure profile from your device
Press the start button, type ‘manage wireless networks’, and click on ‘Manage wireless networks’
On the ‘Manage wireless networks’ menu, select SU-secure from the list and click on ‘Remove’

Follow the SU-secure configuration guide for your device found above
Validate that there are no static IP or DNS server settings
Press the start button, type ‘Network Connections’, and click on ‘View network connections’
On the Network Connections menu that appears, right-click your Wi-Fi adapter and select ‘Properties’

In the Wi-Fi Properties menu, ensure ‘Internet Protocol Version 4’ is checked, highlight it, and then click the properties button
Ensure that both the IP address and DNS server settings are set to Obtain Automatically and then press ‘OK’. Then press ‘OK’ on the Wi-Fi Properties menu

Check for Avast Antivirus: If Avast Antivirus is installed, disable the Secure DNS service it runs by performing the following:
Open Avast b. Browse to Avast > Settings > Active Protection > Secure DNS
Set Secure DNS to OFF
Validate that operating system and device drivers are up to date
Validate that Windows is up to date
Press the start button, type ‘update’, and click on ‘Windows Update’
Click the ‘Check online for updates from Windows Update’ button and allow any updates to install. Once updates are installed, restart your machine.

Validate that wireless drivers are up to date
Press start, type ‘drivers’, and click on ‘Update device drivers’
Expand the ‘Network Adapters’ section of the Device Manager list
Select your wireless adapter from the expanded list and click the ‘Update Driver Software’ button. The name of your wireless adapter may vary from the image below depending on the hardware you are using.
If drivers are updated, restart your machine.

If you are still unable to connect submit a ticket using the IT Service Desk Help Center.
Windows 8
This guide provides step-by-step instructions for troubleshooting common connection issues seen with Windows 8 computers connecting to SU-secure. After completing each numbered section, attempt to connect to SU-secure again. If you are unsuccessful in connecting, continue on to the next numbered section.
Steps for Service Desk Members
Validate that the account is not locked out
Open Active Directory Users and Computers
Search for the account username and double click on the account
Click on the ‘Account’ tab
Validate that there is no ‘This account is locked’ message
If the account is locked, unlock it and have the user attempt to log back in
If repeated lockouts are seen, escalate the request to server engineers to identify which device is locking the user out.
Validate that the account has the correct group membership
Open Active Directory Users and Computers
Search for the username and double click on the account
Click on the ‘Member of’ tab
Validate that the account is a member of one of the following Active Directory groups: ALL-STAFF, ALL-FACULTY, ALLSTUDENT, ALL-ADJUNCT, Jesuit.
Steps for end-users
Validate Username/Password
Visit the SUonline page at https://suonline.seattleu.edu/
Log in to SUonline using your SeattleU credentials.
If you are unable to log in, visit https://pwreset.seattleu.edu/ and click on ‘I forgot my password’. Follow the steps to reset your SeattleU password.
Repeat steps 3a and 3b to validate you can log in to your account before attempting to connect to SU-secure again.
Delete and rebuild SU-secure wireless profile
Remove the existing SU-secure profile from your device
Click on the wifi icon in the system tray
Right click on SU-secure and click ‘Forget this network’

Follow the SU-secure configuration guide for your device found above.
Validate that there are no static IP or DNS server settings
Press the start button, type ‘Network Connections’, and click on ‘View network connections’
On the Network Connections menu that appears, right-click your Wi-Fi adapter and select ‘Properties’

In the Wi-Fi Properties menu, ensure ‘Internet Protocol Version 4’ is checked, highlight it, and then click the properties button
Ensure that both the IP address and DNS server settings are set to Obtain Automatically and then press ‘OK’. Then press ‘OK’ on the Wi-Fi Properties menu

Check for Avast Antivirus:
If Avast Antivirus is installed, disable the Secure DNS service it runs by performing the following:
Open Avast
Browse to Avast > Settings > Active Protection > Secure DNS
Set Secure DNS to OFF
Validate that operating system and device drivers are up to date
Validate that Windows is up to date
Press the start button, type ‘update’, and click on ‘Check for updates’
Click the ‘Check now’ button and allow any updates to install. Once updates are installed, restart your machine.

Validate that wireless drivers are up to date
Press start, type ‘drivers’, and click on ‘Update device drivers’
Expand the ‘Network Adapters’ section of the Device Manager list
Select your wireless adapter from the expanded list and click the ‘Update Driver Software’ button. The name of your wireless adapter may vary from the image below depending on the hardware you are using. iv
If drivers are updated, restart your machine.

If you are still unable to connect
If you are still unable to connect to SU-secure after following the troubleshooting steps in this document, you can contact the Service Desk for assistance.
When opening a support ticket with the Service Desk, please provide the following information:
Your account username (i.e. ‘doej’).
The brand and model of the device you are attempting to connect to SU-secure.
The operating system version of the device you are attempting to connect to SU-secure.
What location (building, room) you are attempting to connect in.
A description of the error message or problem you are seeing.
Windows 10
This document provides step-by-step instructions for troubleshooting common connection issues seen with Windows 10 computers connecting to SU-secure. After completing each numbered section, attempt to connect to SU-secure again. If you are unsuccessful in connecting, continue on to the next numbered section.
Steps for Service Desk Members
Validate that the account is not locked out
Open Active Directory Users and Computers
Search for the account username and double click on the account
Click on the ‘Account’ tab
Validate that there is no ‘This account is locked’ message
If the account is locked, unlock it and have the user attempt to log back in f. If repeated lockouts are seen, escalate the request to server engineers to identify which device is locking the user out.
Validate that the account has the correct group membership
Open Active Directory Users and Computers
Search for the username and double click on the account
Click on the ‘Member of’ tab
Validate that the account is a member of one of the following Active Directory groups: ALL-STAFF, ALL-FACULTY, ALLSTUDENT, ALL-ADJUNCT, Jesuit.
Steps for end-users
Validate Username/Password
Visit the SUonline page at https://suonline.seattleu.edu/
Log in to SUonline using your SeattleU credentials.
If you are unable to log in, visit https://pwreset.seattleu.edu/ and click on ‘I forgot my password’. Follow the steps to reset your SeattleU password.
Repeat step 1 to validate you can log in to your account before attempting to connect to SU-secure again.
Delete and rebuild SU-secure wireless profile
Remove the existing SU-secure profile from your device
Click on the wifi icon in the system tray and click on ‘Network settings’
On the Wi-Fi settings menu, click ‘Manage known networks’
On the ‘Manage known networks’ menu, click on SU-secure and click ‘Forget’

Follow the SU-secure configuration guide for your device found above.
Validate that there are no static IP or DNS server settings
Press the start button, type ‘Network Connections’, and click on ‘View network connections’
On the Network Connections menu that appears, right-click your Wi-Fi adapter and select ‘Properties’
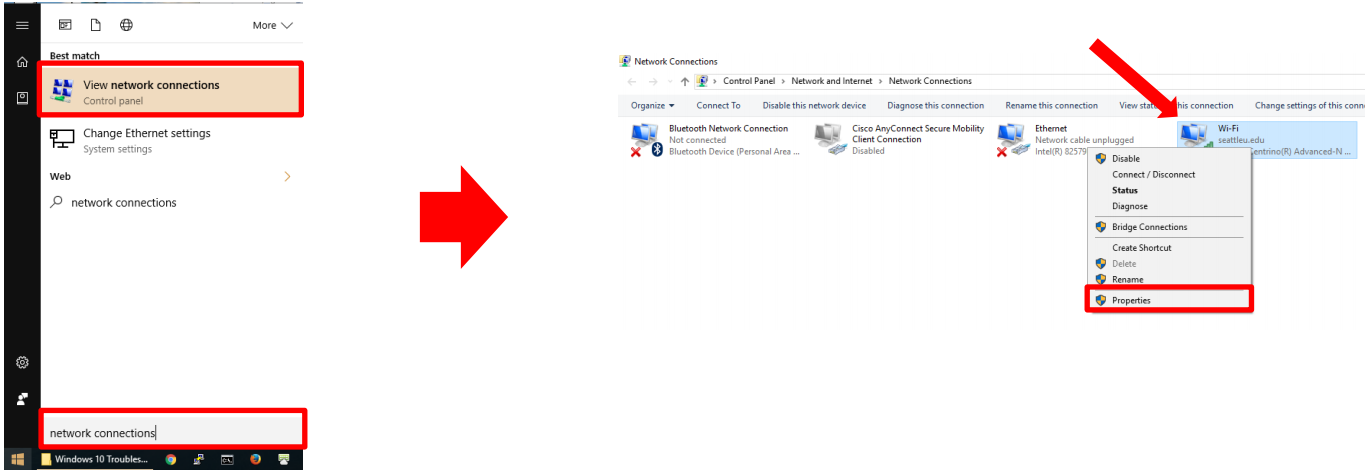
In the Wi-Fi Properties menu, ensure ‘Internet Protocol Version 4’ is checked, highlight it, and then click the properties button
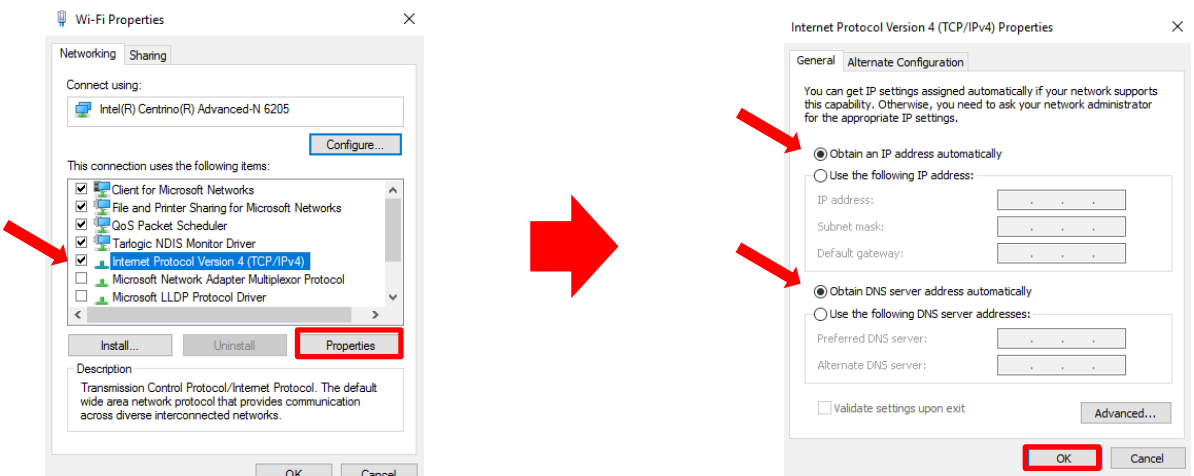
Ensure that both the IP address and DNS server settings are set to Obtain Automatically and then press ‘OK’. Then press ‘OK’ on the Wi-Fi Properties menu
Check for Avast Antivirus: If Avast Antivirus is installed, disable the Secure DNS service it runs by performing the following:
Open Avast Browse to Avast > Settings > Active Protection > Secure DNS
Set Secure DNS to OFF
Validate that operating system and device drivers are up to date
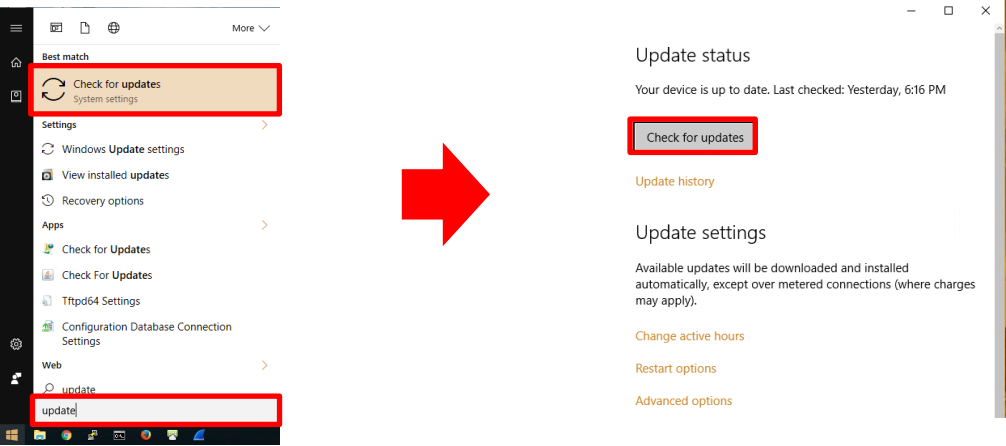
Validate that Windows is up to date
Press the start button, type ‘update’, and click on ‘Check for updates’
Click the ‘Check now’ button and allow any updates to install. Once updates are installed, restart your machine
Validate that wireless drivers are up to date
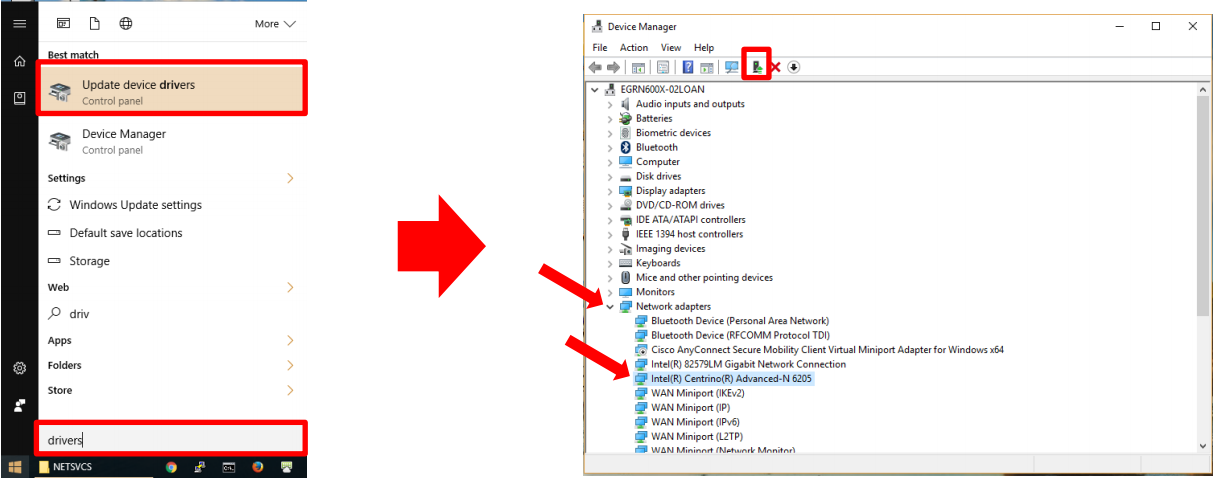
Press start, type ‘drivers’, and click on ‘Update device drivers’
Expand the ‘Network Adapters’ section of the Device Manager list
Select your wireless adapter from the expanded list and click the ‘Update Driver Software’ button. The name of your wireless adapter may vary from the image below depending on the hardware you are using.
If drivers are updated, restart your machine.
If you are still unable to connect
If you are still unable to connect to SU-secure after following the troubleshooting steps in this document, you can contact the Service Desk for assistance
When opening a support ticket with the Service Desk, please provide the following information:
Your account username (i.e. ‘doej’).
The brand and model of the device you are attempting to connect to SU-secure.
The operating system version of the device you are attempting to connect to SU-secure.
What location (building, room) you are attempting to connect in.
A description of the error message or problem you are seeing.
Mac OS X
This guide provides step-by-step instructions for troubleshooting common connection issues seen with Mac OSX computers connecting to SU-secure. After completing each numbered section, attempt to connect to SU-secure again. If you are unsuccessful in connecting, continue on to the next numbered section.
Steps for Service Desk Members
Verify the account is not locked out
Open Active Directory Users and Computers
Search for the account username and double click on the account
Click on the ‘Account’ tab
Validate that there is no ‘This account is locked’ message
If the account is locked, unlock it and have the user attempt to log back in f. If repeated lockouts are seen, escalate the request to Technical Operations to identify which device is locking the user out
Verify the account has the correct group membership
Open Active Directory Users and Computers
Search for the username and double click on the account
Click on the ‘Member of’ tab
Verify the account is a member of one of the following Active Directory groups: ALL-STAFF, ALL-FACULTY, ALL-STUDENT, ALL-NMA, ALL-ADJUNCT, VENDOR_SUsecure, or Jesuits.
Steps for end-users
Verify Username/Password
If you can successfully login at https://webadvisor.seattleu.edu/ then your credentials are working correctly.
If you are unable to login at https://webadvisor.seattleu.edu/ please follow the instructions at https://www.seattleu.edu/its/support/support-articles/reset-your-su-password.html to reset your password.
If you are still unable to authenticate to SU-secure after resetting your password proceed to the troubleshooting steps below.
Verify there are no static IP or DNS server settings
Press the wifi icon in the status menu and select ‘Open Network Preferences’
On the ‘Network’ menu, select your Wi-Fi network and click on ‘Advanced…’

Click on the ‘TCP/IP’ tab and verify ‘Configure IPv4’ is set to ‘Using DHCP’
Click on the ‘DNS’ tab and verify the DNS servers listed are 172.17.72.xx and 172.17.61.26. Remove any other entries. If there are no DNS servers in the list, do NOT manually add any DNS servers. Press ‘OK’ when completed.

Verify if a wireless profile has an outdated security certificate
You will be unable to authenticate to SU-secure if your Mac computer contains an expired security certificate in the SU-secure wireless profile. The former certificate expired Sep 1 2019. Follow the steps below to verify if your Mac has the wireless profile and if so the expiration date of the stored certificate.
From the Apple menu select System Preferences
Select Profiles as shown below

If Profiles is not present there are no profiles configured; this is normal as not all Macs will have it. Skip the remaining steps and exit System Preferences.
Click the SU-secure profile in the left frame. If the Expired date is prior to today’s date, such as the example of Sep 1 2019 below, the expired certificate is used. The wireless profile must be deleted.

Click the minus sign at the lower left of the window to remove the profile. If prompted enter the username and password of the authorized user to remove the profile.
Agree to any remaining prompts to remove the profile

Close the open windows
You should now be able to re-connect to SU-secure and successfully authenticate. Proceed with the remaining steps only if you cannot authenticate to SU-secure and access external web pages.
Forget the SU-secure network
Press the wifi icon in the status menu and select ‘Open Network Preferences’
On the ‘Network’ menu, select your Wi-Fi network and click on ‘Advanced…’

In the ‘Wi-Fi’ tab, select SU-secure, click on the minus button to remove the network, and then click ‘OK’
Click the ‘Apply’ button on the Network menu to apply the settings.

Re-connect to SU-secure following the configuration guide for your device above.
Check for Applications Known to Impact SU-secure Functionality
Avast Antivirus forces your Mac to use external DNS servers. Such DNS use is blocked by the SeattleU firewall. Open Avast, select Settings, select Components, set Secure DNS to off.
Some versions of Cisco AnyConnect Secure Mobility Client prevent internet access while connected to SU-secure. Don’t use this application while connected to SU-secure.
Verify the operating system is up to date
Click the Apple button and select ‘About This Mac’
On the ‘Overview’ tab, select ‘Software Update…’ and install any updates
If you are still unable to connect
If you are still unable to connect to SU-secure after following the troubleshooting steps in this document, you can contact the Service Desk for assistance
When opening a support ticket with the Service Desk, please provide the following information:
Your account username (i.e. ‘doej’).
The brand and model of the device you are attempting to connect to SU-secure.
The operating system version of the device you are attempting to connect to SU-secure.
What location (building, room) you are attempting to connect in.
A description of the error message or problem you are seeing.
iPhone and iPad
Android
Chrome OS
Need additional help? Submit a ticket in our new portal here: IT Service Desk Help Center